Posts

Showing posts with the label archive

Digital Marketing

Create Incremental Backup in Linux

Create Full Backup first tar --verbose --verbose --create --xz --listed-incremental=/backup/data.snxz --file=/backup/data.txz data Check the backup with the following command. $ tar --list --incremental --verbose --verbose --file /backup/data.txz Create Incremental Backup tar --verbose --verbose --create --xz --listed-incremental=/backup/data.snxz --file=/backup/data1.txz data Run the following command to check the incremental backup file. $ tar --list --incremental --verbose --verbose --file /backup/data1.txz Restore Backup with Incremental Backup restore data from full backup first tar --extract  --listed-incremental=/dev/null --file data.txz restore data from incremental backup file tar --extract  --listed-incremental=/dev/null --file data1.txz

How to get Active Transactions and Dead Locks from MySQL

To get a list of active transactions and locks that are currently executing against our target database Simply use: SELECT waiting_trx_id, waiting_pid, waiting_query, blocking_trx_id, blocking_pid, blocking_query FROM sys . innodb_lock_waits ; If a NULL value is reported for the blocking query, see Identifying a Blocking Query After the Issuing Session Becomes Idle .  For MySQL 8, use  performance_schema SELECT r . trx_id waiting_trx_id, r . trx_mysql_thread_id waiting_thread, r . trx_query waiting_query, b . trx_id blocking_trx_id, b . trx_mysql_thread_id blocking_thread, b . trx_query blocking_query FROM performance_schema . data_lock_waits w INNER JOIN information_schema . innodb_trx b ON b . trx_id = w . blocking_engine_transaction_id INNER JOIN information_schema . innodb_trx r ON r . trx_id = w . requesting_engine_transaction_id ; MySQL captures transaction and lock information in the INNODB_TRX, INNODB_LOCK...

Configure Postfix Server as a Relay on CentOS

Install Postfix and ensure that the service is enabled: # yum install postfix cyrus-sasl-plain # systemctl enable postfix In case Sendmail is installed, remove it: # yum remove -y sendmail* Configure Postfix Server as a Relay Note that this section applies to both servers. Open  /etc/postfix/main.cf  for editing and configure the following: relayhost = mail1. goyun.info fallback_relay = mail2.goyun.info Create a new file  /etc/postfix/sasl_passwd  and add the authentication details of the external SMTP server: mail1. goyun.info :587 goyun.info @my-repay-server.com:passwd Prevent non-root access: # chmod 0600 /etc/postfix/sasl_passwd Create a database file: # postmap /etc/postfix/sasl_passwd Check configuration and restart Postfix service: # postfix check # systemctl restart postfix Test it: # echo test|mailx -s TEST receiver@ goyun.info

Testing tools of SPF

http://www.kitterman.com/spf/validate.html www.openspf.org/Tools http://tools.bevhost.com/spf/ https://stopemailfraud.proofpoint.com/spf/ https://mxtoolbox.com/SuperTool.aspx?action=spf%3a goyun.info &run=networktools

How to find out / locate MySQL dead lock

See also: How to get Active Transactions and Locks from MySQL SELECT * FROM information_schema . innodb_locks ; (run it as root) | Warning | 1681 | 'INFORMATION_SCHEMA.INNODB_LOCKS' is deprecated and will be removed in a future release. | For every blocked transaction,  INNODB_LOCKS  contains one row that describes each lock the transaction has requested, and for which it is waiting.  INNODB_LOCKS  also contains one row for each lock that is blocking another transaction, whatever the state of the transaction that holds the lock ( 'RUNNING' ,  'LOCK WAIT' ,  'ROLLING BACK' or  'COMMITTING' ). The lock that is blocking a transaction is always held in a mode (read vs. write, shared vs. exclusive) incompatible with the mode of requested lock. Mode of the lock. One of  'S' ,  'X' ,  'IS' ,  'IX' ,  'S,GAP' ,  'X,GAP' ,  'IS,GAP' ,  'IX,GAP' , or 'AUTO_INC'  for shared, exclusi...

How to rotate-log in GlassFish

asadmin rotate-log

Homebase Electronic Timer Operation Instructions

Image
Charging If your timer has sat unused for some time then you may need to leave it plugged into the mains for a bit to recharge its internal battery. Timer Modes The timer has five basic modes: Normal operating mode Time Set mode Program (Timers) set mode Random (RND) mode Countdown timer (CTD) mode Note If at any time if you don’t press a button for more than around 5 seconds the unit will drop out of setting modes into normal operation mode Reset To  perform a complete reset of the timer press the small round ‘R’ button with a pencil, or similar. To reset/clear a single timer, when in programme mode (see "Set Programmes" below) press the 'finger' button. Set AM/PM or 24hr clock Mode Press and hold the ‘TIME' button for around 3 seconds and the timer will change between AM/PM and 24hr clock display modes. In AM/PM mode AM or PM is displayed just to the right of the seconds count   Set Summer Time or Winter Time (BST/GMT) There's no need to adjust the actual cl...

Scriptable email client on Linux

The MH message handling system is a set of electronic mail programs in the public domain. If your computer runs Unix, it can probably run MH.The big difference between MH and most other "mail user agents" is that you can use MH from a Unix shell prompt. In MH, each command is a separate program, and the shell is used as an interpreter. So, all the power of Unix shells (pipes, redirection, history, aliases, and so on) works with MH--you don't have to learn a new interface. Other mail agents have their own command interpreter for their individual mail commands (although the mush mail agent simulates a Unix shell). Because MH commands aren't part of a monolithic mail system, you can use them at any time; you don't have to start or quit the mail agent. Because you use them from a shell prompt, you can use all the power of the shell. If your shell has time-saving aliases or functions (and most do),you'll be able to use them with MH, of course. And because MH isn...

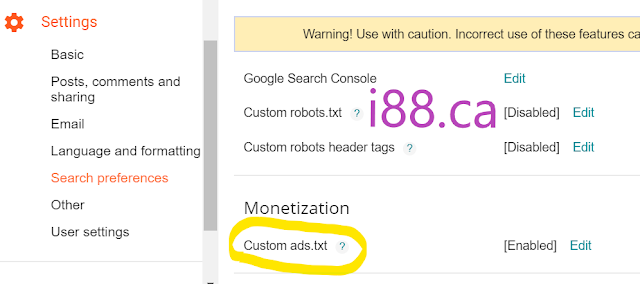
How to Add Custom Ads.Txt File in Blogger?

Image
You can now manually set up the content of the ads.txt file via Blogger settings without the need of uploading any file to Blogger’s root directory, which doesn’t exists. Sign in to Blogger at blogger.com In the top left, click the Down arrow Down Arrow . Click the blog you want to set up an ads.txt file on. On the left, click  Settings . Under “Settings,” click  Search preferences . Under “Monetization,” find “Custom ads.txt” and click  Edit . Click  Yes . Copy the settings from your third-party monetization provider and paste them in the text box. Click Save settings.

Fixed: could not determine the current user, please set $USER

Forwarding the $USER environment variable to solve the problem: docker run -it --rm -e USER=$USER bash

How to reconnect to a docker container

If you want to continue from what you left in the docker: Usage example docker exec -it f32de2737e88 bash

Enabling Vertical (\G) Output in the MySQL Client my.cnf configuration file

Add an option to the .my.cnf file: [mysql] vertical

Microsoft Evaluation Center

The Microsoft Evaluation Center brings you full-featured Microsoft product evaluation software available for download or trial

Reset openvpn admin's password

ssh to your openvpn as server: sudo passwd openvpn

Check the current tty/pts session where you connected

$ ps   PID TTY          TIME CMD  7920 pts/1    00:00:00 bash  7986 pts/1    00:00:00 ps Or Use tty $ tty /dev/pts/0

Kill or terminate unwanted tty/pts sessions in Linux

Find out who is login $ w Find out which process id $ ps -ft pts/1 Kill that process id $ kill -9 Or pkill -9 -t pts/0

How to bind / configure NIC teaming/bonding in CentOS / Oracle Linux / RedHat Linux

Following is an example of how to configure NIC teaming/bonding 1) create channel bonding interface $ sudo vim /etc/sysconfig/network-scripts/ifcfg-bond0 DEVICE=bond0 BOOTPROTO=none IPADDR= 192.168 .1 .199 NETMASK= 255.255 .254 .0 GATEWAY= 192.168 .1 .1 ONBOOT=yes USERCTL=no TYPE=Ethernet DNS1= 8.8 .8 .8 DNS1= 8.8 .4 .4 IPV6INIT=no $ sudo vim /etc/sysconfig/network-scripts/ifcfg-em1 (em2, em3 ...) and add/change the values: TYPE=Ethernet BOOTPROTO=none IPV4_FAILURE_FATAL=no NAME=em1 ONBOOT=yes MASTER=bond0 SLAVE=yes USERCTL=no NM_CONTROLLED=no 2)edit /etc/modprobe.d/ $ sudo vim /etc/modprobe.d/bond0.conf alias bond0 bonding 3)config mode=4 #echo "802.3ad 4" > /sys/class/net/bond0/bonding/mode ( If you failed to modify the file content by vim, this echo command can help you ) ( When your bonding is running, you may not be able to modify it, you may need to stop it by systemctl stop network before you can modify it ) (optional, defaults to 'balance-rr 0') If you conf...

How to bind / configure NIC teaming/bonding in CentOS / Oracle Linux / RedHat Linux

Following is an example of how to configure NIC teaming/bonding 1) create channel bonding interface $ sudo vim /etc/sysconfig/network-scripts/ifcfg-bond0 DEVICE=bond0 BOOTPROTO=none IPADDR= 192.168 .1 .199 NETMASK= 255.255 .254 .0 GATEWAY= 192.168 .1 .1 ONBOOT=yes USERCTL=no TYPE=Ethernet DNS1= 8.8 .8 .8 DNS1= 8.8 .4 .4 IPV6INIT=no $ sudo vim /etc/sysconfig/network-scripts/ifcfg-em1 (em2, em3 ...) and add/change the values: TYPE=Ethernet BOOTPROTO=none IPV4_FAILURE_FATAL=no NAME=em1 ONBOOT=yes MASTER=bond0 SLAVE=yes USERCTL=no NM_CONTROLLED=no 2)edit /etc/modprobe.d/ $ sudo vim /etc/modprobe.d/bond0.conf alias bond0 bonding 3)config mode=4 #echo "802.3ad 4" > /sys/class/net/bond0/bonding/mode ( If you failed to modify the file content by vim, this echo command can help you ) ( When your bonding is running, you may not be able to modify it, you may need to stop it by systemctl stop network before you can modify it ) (optional, defaults to 'balance-rr 0') If you conf...

Open source client for AnyConnect

"network-manager-openconnect-gnome" package in the Ubuntu Repository. It uses OpenConnect which is an open source client for AnyConnect. You can find the package in the Ubuntu Software Center or Synaptic by searching for "OpenConnect." If you wish to install it via the command-line, you can do so with: sudo apt install network-manager-openconnect-gnome

Executable JAR by maven

You can simply use java -cp path -to-your-jar: path -to-your-lib your-full- main - class - name   to run the jar. For example: java -cp /i88/ca/example.jar:/i88/ca/lib/* it.goyun.info.example.App If you encounter "Failed to load Main-Class manifest attribute" problem, this is probably because you have no Main-Class attribute specified in the manifest file. To create an executable JAR, one simply needs to set the main class that serves as the application entry point. < properties > < project .build.sourceEncoding>UTF-8</ project .build.sourceEncoding> </ properties > < build > < plugins > < plugin > < groupId >org.apache.maven.plugins</ groupId > < artifactId >maven-jar-plugin</ artifactId > < version >2.6</ version > < configuration > < archive > ...