Posts

Showing posts from October, 2020

Digital Marketing

The integration between Docker and Amazon ECS

The integration between Docker and Amazon ECS allows developers to use the Docker Compose CLI to: Set up an AWS context in one Docker command, allowing you to switch from a local context to a cloud context and run applications quickly and easily Simplify multi-container application development on Amazon ECS using Compose files

Watching a file to keep the container running.

tail -f /dev/null

A container adds additional isolation not available when simply using chroot.

A container is extended version of chroot A chroot on Unix operating systems is an operation that changes the apparent root directory for the current running process and its children. A program that is run in such a modified environment cannot name files outside the designated directory tree. The term "chroot" may refer to the chroot(2) system call or the chroot(8) wrapper program. The modified environment is called a chroot jail.

Allow multiple Docker containers to communicate with each other by Docker network

For example a client application in another Docker container can access the database Server in the server container.  First, create a Docker network: docker network create goyun-info-net When you are creating and starting the server and the client containers, use the --network option to put them on network you created. For example: docker run --name=mysql1 --network=goyun-info-net -d mysql/mysql-server docker run --name=myapp1 --network=goyun-info-net -d myapp The myapp1 container can then connect to the mysql1 container with the mysql1 hostname and vice versa, as Docker automatically sets up a DNS for the given container names .  In the following example, we run the mysql client from inside the myapp1 container to connect to host mysql1 in its own container: docker exec -it myapp1 mysql --host=mysql1 --user=myuser --password For other networking techniques for containers, see the Docker container networking section in the Docker Documentation.

Fixed: AWS CodeCommit Permission Denied issue

When trying to push to the remote repo. Permission denied (publickey). fatal: Could not read from remote repository. Please make sure you have the correct access rights and the repository exists. On your local machine, use a text editor to create a config file in the ~/.ssh directory, and then add the following lines to the file, where the value for User is the SSH key ID you copied earlier:   Host git-codecommit.*.amazonaws.com User APKAEIBAERJR2EXAMPLE IdentityFile ~/.ssh/ codecommit_rsa

Install Ajenti Control Panel on Ubuntu

systemctl: command not found on ubuntu docker

sudo apt-get install systemd Or re-install sudo apt-get install --reinstall systemd

The Ajenti Project consists of Ajenti Core and set of stock plugins forming the Ajenti Panel.

Ajenti Core: Web interface development framework which includes a web server, IoC container, a simplistic web framework and set of core components aiding in client-server communications. Ajenti Panel: Consists of plugins developed for the Ajenti Core and a startup script, together providing a server administration panel experience.

Linux: Check Which Port Number a Process is Listening on

$ sudo ss -ltnp l: display only listening sockets t: display tcp connection n: display addresses in a numerical form p: display process ID/ Program name $ sudo lsof -i :80 This command will list all processes using TCP port number 80.

Find the default port number of a given service in Linux

To find the default port number of a given service in Linux: $ grep <port> /etc/services For example, to find the default port of a SSH service, simply run: $ grep ssh /etc/services

Full List of JVM System Properties

You can check he full list of system properties of JVM and their current value for  Oracle JDK or OpenJDK:  1 java -XshowSettings:properties  -version -version is used just to avoid displaying the usage of java command which is displayed if no standard option is specified. You can also use: jcmd <pid> VM.system_properties

Start ssh agent automatically with powershell

Set-Service ssh-agent -StartupType automatic Start-Service ssh-agent

HTTP microservices, reactive applications, message-driven microservices and serverless are now central players in modern systems.

The client-server architecture is not longer the de-facto standard to build applications.

Online Code Editor

Collabedit is an online code editor that lets people collaborate in real-time. It works in your web browser so no installation is needed. Try it now, no account necessary, just click  here . Features text editor chat document history syntax highlighting for programming languages

Check Which Port Number a Process is Listening on

$ sudo ss -ltnp State Recv-Q Send-Q Local Address:Port Peer Address:Port LISTEN 0 100 127.0.0.1:25 0.0.0.0:* users:(("master",pid=3877,fd=13)) LISTEN 0 128 0.0.0.0:443 0.0.0.0:* users:(("sshd",pid=4544,fd=3)) LISTEN 0 127 0.0.0.0:988 0.0.0.0:* LISTEN 0 2 0.0.0.0:3389 0.0.0.0:* users:(("xrdp",pid=4060,fd=11)) LISTEN 0 128 127.0.0.1:38591 0.0.0.0:* users:(("containerd",pid=3748,fd=8)) LISTEN 0 128 0.0.0.0:111 0.0.0.0:* users:(("rpcbind",pid=2704,fd=8)) LIST

MONyog Default

Default MONyog port is 5555 • Default user name is “admin” • Default Password is Empty 

Get current IP address from command line

$ alias myip='export IP=`curl -s https://checkip.amazonaws.com`;echo $IP'

Reset the MONyog admin password

To reset the admin password, Stop MONyog service. Remove/empty the 'Password' string in the ‘MONyog.ini’ file and save it. Restart MONyog service. After removing the password and restarting the MONyog service, you should be able to login to Monyog UI using 'admin' username and a blank password.

How to Start one or more stopped containers

Example: $ docker start goyun_info_container

How to start a docker container as daemon process

Instead of running docker container with an interactive shell it is also possible to let docker container to run as a daemon which means that the docker container would run in the background completely detached from your current shell.  $ docker run --name goyun -d centos /bin/sh -c "while true; do sleep 8s; done" Use docker exec to reattach to your container interactive shell: $ docker exec -it goyun /bin/bash

Create Password Protected ZIP in Linux command

Use the zip command with -p flag to create a password protected zip archive: $ zip -e  goyun.info.contract.pdf

Red Hat JBoss Developer Studio (JBDS)

JBoss Developer Studio (JBDS) is an Integrated Development Environment (IDE) provided by Red Hat to simplify the development of Java EE applications. It is a set of integrated and well-tested plug-ins on top of the Eclipse™ platform. JBDS has the following built-in features: Plug-ins to simplify development of applications using Red Hat JBoss middleware. Unit testing plug-ins and wizards to do Test Driven Development (TDD). A visual debugger to help debug local and remote Java applications. Syntax highlighting and code completion for the most commonly used Java EE APIs, such as JPA, JSF, JSP, EL, and many more. Maven integration to simplify project builds, packaging, testing, and deployment. Unit adapters and plug-ins to work with JBoss EAP. You can control the life cycle (start, stop, restart, deployment, undeployment) of EAP without leaving the IDE.
Setup DNS Server with Docker Container

Quickstart Start BIND using: $ sudo docker run --name bind -d --restart=always  --publish 53:53/tcp --publish 53:53/udp --publish 10000:10000/tcp  --volume /opt/docker/bind:/data sameersbn/bind Login to Webmin with the username  root  and password  password . Specify  --env ROOT_PASSWORD=secretpassword  on the  docker run  command to set a password of your choosing. Persistence For the BIND to preserve its state across container shutdown and startup you should mount a volume at  /data . The  Quickstart  command already mounts a volume for persistence. SELinux users should update the security context of the host mountpoint so that it plays nicely with Docker: mkdir -p /opt/docker/bind chcon -Rt svirt_sandbox_file_t /opt/docker/bind Shell Access docker exec -it bind bash

Install docker on Oracle Linux 8

Install Docker on Oracle Linux dnf install -y dnf-utils zip unzip dnf config-manager --add-repo=https://download.docker.com/linux/centos/docker-ce.repo dnf install -y docker-ce --nobest

The eval command is used to execute the arguments as a shell command on unix or linux system.

Eval command comes in handy when you have a unix or linux command stored in a variable and you want to execute that command stored in the string. The eval command first evaluates the argument and then runs the command stored in the argument. Example: eval `ssh-agent` eval $(ssh-agent) An agent is a program that keeps your keys in memory so that you only need to unlock them once, instead of every time. ssh-agent does this for SSH keys. eval `ssh-agent` – this runs the agent in background, and sets the apropriate environment variables for the current shell instance.

How to run Docker inside WSL Ubuntu

$ sudo /usr/bin/dockerd & $ sudo docker run hello-world

Install openssh-client on WSL Ubuntu

If your WSL distro does not have ssh-keygen installed, run: $ sudo apt-get install openssh-client -y

Use the qemu-img utility to convert the KVM image to a VHDX image

$ sudo apt-get install qemu-utils -y $ qemu-img convert ubuntu-core-18-amd64.img -O vhdx -o subformat=dynamic ubuntu-core-18-amd64.vhdx

Install XRDP+XORGXRDP via source on Ubuntu

microsoft / linux-vm-tools

Ubuntu Core is a tiny, transactional version of Ubuntu Linux from Canonical.

Ubuntu Core  is designed for 'internet of things' (IoT) devices and large container deployments.  Ubuntu Core uses snaps exclusively as a package manager. Unlike traditional Ubuntu, there is no apt package manager here. Learn more about Ubuntu Core.

Fixed – ping: socket: Operation not permitted

Error when trying to ping ping: socket: Operation not permitted Solution: sudo chmod 4711 /usr/bin/ping

Run and forward ssh-agent

To run ssh-agent: eval $(ssh-agent -s) To forward the services of your local ssh agent to the remote-host. ssh -A remote-host For security reasons agent forwarding should only be use with hosts run by trustworthy people, but it is better than running a complete agent remotely any time. Allow Forwarding in Your Client’s Config Host example   ForwardAgent yes

Changing Ubuntu Screen Resolution in a Hyper-V VM

Open Terminal Type: sudo vi /etc/default/grub Find the line starting with GRUB_CMDLINE_LINUX_DEFAULT, and add video=hyperv_fb:[the resolution you want]. The resolution I want is 1280x720. So my line ends up looking like this: GRUB_CMDLINE_LINUX_DEFAULT="quiet splash video=hyperv_fb:1280x720" Write the changes and quit vi. Run: sudo update-grub Reboot the virtual machine

Terminate all WSL instances

Terminate all WSL instances using the command: wsl --shutdown

Set Default Windows Subsystem for Linux (WSL) Distro in Windows

PS C:\WINDOWS\system32> wsl -l --all Windows Subsystem for Linux Distributions: Ubuntu-20.04 (Default) docker-desktop-data PS C:\WINDOWS\system32> Change default: wsl -s <DistributionName> OR wsl --setdefault <DistributionName>

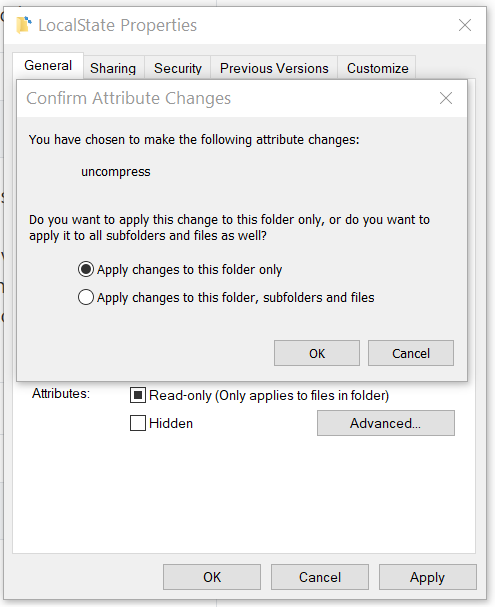
Fixed WSL2: Virtual hard disk files must be uncompressed and unencrypted and must not be sparse

Image
If you encounter this: PS C:\WINDOWS\system32> wsl.exe --set-version Ubuntu-20.04 2 Conversion in progress, this may take a few minutes... For information on key differences with WSL 2 please visit https://aka.ms/wsl2 The requested operation could not be completed due to a virtual disk system limitation.  Virtual hard disk files must be uncompressed and unencrypted and must not be sparse. Try either way: 1. running those two commands: fsutil behavior set disableencryption 1 fsutil behavior set disablecompression 1 And reboot. Or 2. Go to the Ubuntu directory in your profile folder (something like %USERPROFILE%\AppData\Local\Packages\CanonicalGroupLimited...), right click on "LocalState", Properties, Advanced, deselect "Compress contents" and "Encrypt contents".  You can choose "Apply changes to this folder only.  

Shutdown Windows from powershell

Open the PowerShell on your PC and RUN as Administrator. On the PowerShell type the Command “shutdown.exe /s /t  60″ (i.e 1 Minute)